Active Directory Health & Security Status Required Permissions

In order for the InfraSOS Agent service to correctly report on the health and security status of your Active Directory, it should be run as a special user (service account) (by default, the system runs the InfraSOS Agent service under the “Local system account”, which lacks permissions necessary for the InfraSOS Agent). In this documentation, we provide step-by-step instructions on how to configure the special user account.
Enable PS Remoting on DCs
Our agent server uses LDAP and PowerShell to report against your Active Directory. PowerShell Remoting must be enabled on all DCs in your domain. You can enable it by executing the following command in PowerShell on each domain controller:
Enable-PSRemoting -Force
Install RSAT ADDS Tools on Agent Server
The Microsoft RSAT tools for ADDS needs to be installed if not already installed. Run the following Powershell command on the agent server to install:
Install-WindowsFeature RSAT-ADDS-Tools -IncludeAllSubFeature
DC Firewall Ports
Confirm on your domain controllers, you have the following ports allowed to communicate from the agent server:
- Windows Remote Management (HTTP-In) (Inbound) - Allow Connection
- Windows Management Instrumentation (DCOM-In) - Allow Connection
- Windows Management Instrumentation (WMI-In) - Allow Connection
- Windows Management Instrumentation (ASync-In) - Allow Connection
Create an Active Directory user (Service Account)
We recommend creating a separate Active Directory user for running the InfraSOS Agent service. The following guide explains how to:
- Open your “Active Directory Users & Computers“;
- Choose the location (OU) where you want to create a new user and click New ⇒ User
- In the modal window for creating a user:
- “Full name”: InfraSOS User
- “User SamAccountName logon”: InfraSOSUser
- “Password” – for this field, use a string password. When we delegate the user to run the InfraSOS Agent service, the password is needed.
- “Password options” section:
- Use “Other password options”
- Set the flag for “Password Never Expired” (it’s not required, but this user will be used only for service running, that’s why be ready to update login info for the service without this flag)
- Set the flag for “User cannot change password” (it’s not required)
- Click OK to save the new InfraSOS User.

Granting Permissions to newly created InfraSOS AD Service Account.
In order for your InfraSOS service account to read your domain, you will need to assign permissions to your account. There are 2 ways to achieve this with the following 2 options:
- Using “Option 1” is much easier to configure, but it can be rejected by your company’s security policy.
- Using “Option 2” Requires a few steps to configure, but this method may be more in line with your company's security policy
Option 1: Grant the user “Domain Admins”
1.1 Add the user to the “Domain Admins” group
- In your “Active Directory Users & Computers”, find and open the InfraSOSUser user which was created in the “Create a user” step
- In the section “Member of”, click on the Add…
- In the modal window:
- In the “Enter the object names to select (examples)” field, set the Domain Admins
- Click Check Names
- If the user was found, click OK
- Click OK for the user editing window

1.2 Run the InfraSOS agent service as:
- On the server where the InfraSOS agent is installed, Open the Services (services.msc).
- In the list of services, find the service named InfraSOS Agent.
- Right-click on the service ⇒ Properties ⇒ Log On.
- Change the switcher to This account.
- Click on the Browse… .
- In the modal window:
- In the “Enter the object names to select (examples)” set the InfraSOSUser user
- Click Check Names
- Click OK.
- Enter the Password and Confirm password (use credentials from the selected user).
- Click OK
- Note: You should see the message “The account <your domain>\InfraSOSUser has been granted the Log On As a Service rights”
- Restart the InfraSOS Agent service for the changes to be applied
That’s all you need to do in order for the InfraSOS agent to have permission to read your AD using option 1 above. You can now reload the InfraSOS portal to check if the Active Directory Health & Security Dashboard loads.
Option 2: Grant the user the minimal required privileges
2.1 Add InfraSOS user to local admin group on agent server.
Add the newly created InfraSOSUser service account to the local administrators group on the agent server. This is to allow the agent to be automatically upgraded when new versions of the agent are released.
2.2 Assign user permission to read AD (using delegation of rights):
- Open the “Active Directory Users and Computers”
- Set Advanced Features:
- At the top of the window, click View
- Check if the flag is available for the Advanced Features
-
- Right-click on <your domain name>
- Click Delegate Control…
-
- In the window:
- Click Next ⇒ Add
- In the window:
- In the Enter the object names to select (examples) field, set the InfraSOSUser which you created before
- Click Check Names
- If the user was found, click OK
-
- Click Next
- In the Delegate, the following common task:
- Check the box for Read all user information.
- Check the box for Generate Resultant Set of Policy (Logging)
- Next ⇒ Finish
-


2.3 Add the user to the required groups
- Find the InfraSOSUser and open Properties for this user
- Select the 'Member of' option from the navigation panel on the far left.
- Click the Add…
- In the window:
- In the “Enter the object names to select (examples)” field, copy and set the text “Remote Desktop Users; Remote Management Users; Server Operators; Performance Log Users; Event Log Readers”
-
- Click Check Names
- If the group was found, click OK
- In the “Enter the object names to select (examples)” field, copy and set the text “Remote Desktop Users; Remote Management Users; Server Operators; Performance Log Users; Event Log Readers”
- Click OK
- Close the “Active Directory Users & Computers”

2.4 Set Local Security Policy on Agent Server.
- Open the “Local Security Policy” application on agent server.
- Choose the option Local Policies on the navigation panel on the left.
- Choose the option User Rights Assignment on the navigation panel on the left in the opened folder.
- In the window, double click policy – Log on as a service
- Click Add User or Group
- In the window:
- In the “Enter the object names to select (examples)” field, set the InfraSOSUser
- Click Check Names
- If the user was found, click OK
-
- Now open and execute in PowerShell or CMD as administrator, the following command to force this to update locally on your agent server: command “gpupdate /force”.

gpupdate /force

2.5 Rights for WMI Namespace on Domain Controllers
This step gives the service account read access using the WMI namespaces. On each domain controller perform the following:
- Configure WMI Namespace Rights
- Run wmimgmt.msc.
- Right-click WMI Control, select Properties.
- On the Security tab, select Root and click Security.
- Click Advanced
- Click Add
- Click Select a principal
- Enter InfraSOSUser account
- Allow Execute Methods, Enable Account, Remote Enable, and Read Security permissions for InfraSOSUser.
- Under Applies To, select This namespace and all subnamespaces.
- Click Ok on the remaining Windows.
-
- Back to the Security tab
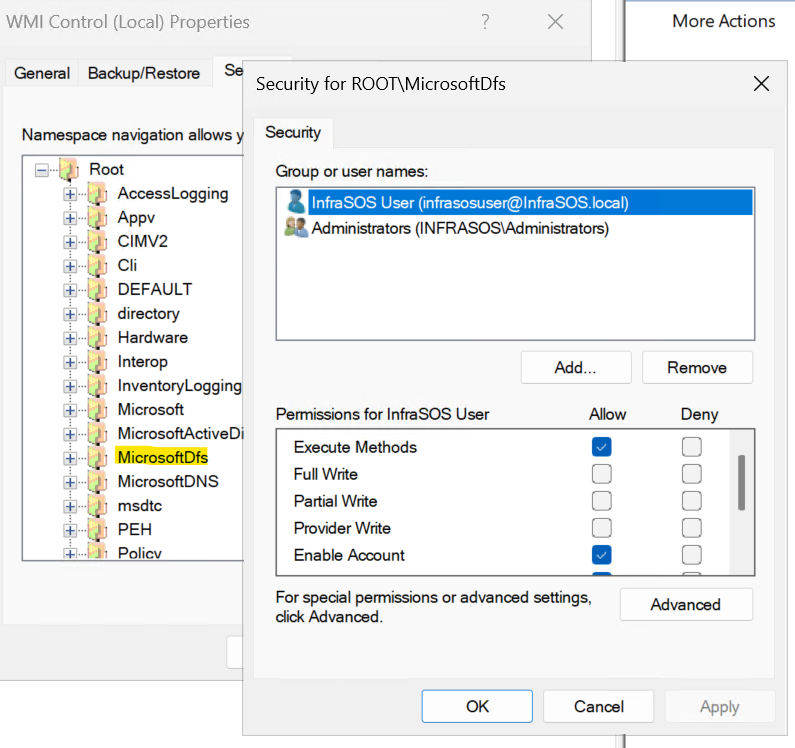
- In the “Root” folder, select “MicrosoftDFs” folder
- Click the “Security” button at the bottom-right corner
- In the “Security for ROOT\MicrosoftDfs” window, click on the “Add” button
- In the window:
- In the “Enter the object names to select (examples)” field, set the InfraSOSUser
- Click Check Names
- If the user was found, click OK
- Below for “Permissions for InfraSOSUser” allow the “Execute methods”, “Enable Account”, “Remote enable”, “Read security”.
-
- Click OK


2.6 Configuring SCManager SDDL Modification
This is an advanced step. It must be performed with the utmost care and attention to detail, as incorrect changes could impact system stability.
If these permissions are not configured, the InfraSOS agent will be unable to gather the necessary data from your remote Domain Controllers local Windows services, and some (not all) checks will have “Error” status. Specifically, the checks that test the start type of certain Windows services such as (e.g., Automatic, Manual) and current status (e.g., Running, Stopped) of services on your Domain Controllers will have “Error” status.
You need to do the following on each Domain Controller.
- Retrieve the Current SCManager SDDL by executing the following command via PowerShell (admin privileges required):
sc.exe sdshow scmanager
- Backup the SDDL you see in the terminal. This will allow for restoration if needed. Simply copy to notepad.
- Use the following script to modify the existing SDDL string by adding a new ACE to the SDDL. This will allow the InfraSOSUser to query the information about services on remote DCs.
function New-SDDLScmanagerString {
    [CmdletBinding()]
    param ($User)
    $SID = (New-Object System.Security.Principal.NTAccount($User)).Translate([System.Security.Principal.SecurityIdentifier]).Value
    if ($SID -eq $null) {
        throw 'Could not find the provided domain user. Ensure a correct username is passed to the script. Aborting script'
    }
    # Obtain current SDDL string
    $oldSDDL = sc.exe sdshow scmanager
    # Validate the output
    if ($oldSDDL -is [System.Collections.ICollection] -or $oldSDDL -is [Array]) {
        if ($oldSDDL -ne $null -and $oldSDDL.Count -ge 2) {
            $oldSDDL = $oldSDDL[1]
        } else {
            throw 'Could not find current SDDL. Aborting script. Contanct our support team to aquire assistance'
        }
    }
    # These flags provide the "read" access we need
    $newACE = "(A;;CCLCSWLORCRP;;;$SID)"
    # Find the index of "D:". The "D:" starts the dacl_flags part of SDDL.
    $dColonIndex = $oldSDDL.IndexOf("D:")
    if ($dColonIndex -eq -1) {
        throw "Error: 'D:' part not found in the SDDL string. Aborting script."
    }
    $newSDDL = $oldSDDL.Insert($dColonIndex + 2, $newACE)
    if ($VerbosePreference -eq 'Continue') {
        @{
            NewSDDL = $newSDDL
            OldSDDL = $oldSDDL
            NewAce = $newACE
        }
    } else {
        $newSDDL
    }
}
Once you've run the above script above, now run the following command against the InfraSOSUser account as follows:
New-SDDLScmanagerString -User InfraSOSUser
- Carefully review a new SDDL string. The only difference between the old and the new version should be the presence of a new ACE right after the “D:” substring in the old string. E.g.:
- Old SDDL: “D:(A;;CC;;;AU)(A;;CCLCRPRC;;;IU)(A;;CCLCRPRC;;;SU)(A;;CCLCRPWPRC;;;SY)(A;;KA;;;BA)(A;;CC;;;AC)S:(AU;FA;KA;;;WD)(AU;OIIOFA;GA;;;WD)”
-
New SDDL: “D:(A;;CCLCSWRPRC;;;S-1-5-21-955249101-4112791911-1846985546-142103)(A;;CC;;;AU)(A;;CCLCRPRC;;;IU)(A;;CCLCRPRC;;;SU)(A;;CCLCRPWPRC;;;SY)(A;;KA;;;BA)(A;;CC;;;AC)S:(AU;FA;KA;;;WD)(AU;OIIOFA;GA;;;WD)”
A new ACE is highlighted. Note that the new ACE is located right after the “D:” substring and that nothing else is changed.
- If the old and the new SDDL strings differ more than expected, run the script with a “-Verbose” flag. The script will now output the new ACE, and both old and new SDDL strings. You will be able to manually copy the new ACE, and paste it in the old SDDL string right after the “D:” substring.
- After checking the new SDDL string, execute the following command to update the SCManager SDDL (admin privileges are required) Pay attention to the fact that the new SDDL string must be wrapped in double quotes and on 1 line, try not to break the line:
sc.exe sdset scmanager "<new sddl>"
Example:
sc.exe sdset scmanager "D:(A;;CCLCSWRPRC;;;S-1-5-21-955249101-4112791911-1846985546-142103)(A;;CC;;;AU)(A;;CCLCRPRC;;;IU)(A;;CCLCRPRC;;;SU)(A;;CCLCRPWPRC;;;SY)(A;;KA;;;BA)(A;;CC;;;AC)S:(AU;FA;KA;;;WD)(AU;OIIOFA;GA;;;WD)"

Note: if you get error '[SC] ConvertStringSecurityDescriptorToSecurityDescriptor FAILED 1804:
The specified datatype is invalid.'
Make sure the command is on one line, command must not contain any new lines or spaces.
- If for any reason you want to restore the previous state of the system, execute the following command (admin privileges are required):
sc.exe sdset scmanager "<old sddl>”
The new ACE looks like this: “(A;;CCLCSWRPRC;;;<user-SID>)”. Let’s break it down. The “A;;” is an ACE type – “ACCESS_ALLOWED_ACE_TYPE”. “CCLCSWRPRC;;;” is a set of flags that describe all read permissions the InfraSOSUser needs to query information about DC services. The “<user-SID>” part is an account SID to which the ACE is applied. More information can be found at the official Microsoft documentation page.
2.7 Give access to the InfraSOS Agent folder
- Find the location of the InfraSOS FZCO folder (usually it’s on C:\Program Files)
- Right-click on the folder InfraSOS FZCO ⇒ Properties ⇒ Security
- For the “Group or user names” click on Edit… ⇒ Add…
- In the window:
- In the “Enter the object names to select (examples)” field, set the InfraSOSUser
- Click Check Names
- If the user was found, click OK
- Select the InfraSOSUser in the list
- Below for “Permissions for InfraSOSUser” allow the Write permission
- Click OK

2.8 Run the service as
- Open the Services (services.msc).
- In the list of services, find the service named InfraSOS Agent.
- Right-click on the service ⇒ Properties ⇒ Log On.
- Change the switcher to This account.
- Click on Browse… .
- In the modal window:
- In the “Enter the object names to select (examples)” set the InfraSOSUser user
- Click Check Names
- Click OK.
- Enter the Password and Confirm password (use credentials from the selected user).
- Click OK
- Note: You should see the message “The account <your domain>\InfraSOSUser has been granted the Log On As a Service rights”
- Restart the InfraSOS Agent service for the changes to be applied
- Now restart the InfraSOS Agent server just to make sure all new permissions are applied.

Once all the above permissions have been applied, you're now ready to run your first Active Directory Health & Security Status report.
Common FAQs / Errors
If you get the specified module GroupPolicy was not loaded or the term 'Get-GPO' is not recognized, run the following to install on agent server:
Install-WindowsFeature GPMC -IncludeManagementTools
If you receive the following error when trying to run a sync 'Health Status Sync returned empty result. Contact our support team.' Make sure you have the Microsoft RSAT tools for ADDS installed. Run the following Powershell command on the agent server to install:
Install-WindowsFeature RSAT-ADDS-Tools -IncludeAllSubFeature